In conclusion to this project, I have really enjoyed exploring ideas and methods surrounding the theme of World War one.
I have learnt lots of new techniques and processes which will help with my future work.
In terms of my props, I think that they fit the brief in aiming for realism. I tried to adapt/ make these items as close as I could to the real thing, keeping in mind the lecture we had with Chris at the beginning of the project about how Realism is without embellishment or interpretation etc.
I think that experimenting with a mock up lid for the Queen Mary tin paid off as this helped me eliminate errors to make my final tin as best as it could be. If I was to make this again however, I would experiment with different ways of making it (vacuum form/ casting & moulding) to get an even more realistic finish.
The Teddy Bear went well, however I feel that if I had more time I would experiment with different ways of ageing it to give a more realistic feel. I also thought once I had finished whether it would be possible for the audience to see the ageing from far away as this is a prop for theatre. This is something I have to consider more with my work in the future.
Wednesday 2 November 2011
Health and safety for my props
Making the Queen Mary tin

- · Make sure you have a clean work space
- · Cut the wire carefully. Make sure your fingers aren't in the way and you don’t let small bits of wire go everywhere. This could injure somebody later on.
- · Be careful of your fingers when using sandpaper.
- · Be careful when using scissors to scratch the tin. Scratch away from you because if you slip, this could lead to injury.
- · Clean work space afterwards.
Making the Teddy bear

- · Be careful with scissors when cutting the fabric etc.
- · Take care when using the un-picker; it is very easy to slip.
- · Be careful with the needle as you are sewing. You can wear a thimble if necessary.
- · Clean work space once finished.
Health and safety
Vacuum forming army helmets

- · Make sure you have a clean work space. Objects in the way of your work could be dangerous to you and others around you.
- · As you use scissors/ scalpel to cut the plastic, be careful your fingers aren't in the way.
- · When using the drill (for the block of wood) in the workshop, make sure you are wearing goggles and steel toe capped boots. Also stand at arm’s length from the machine and hold the block of wood with one hand as far away from the drill bit as you can and another hand on the drill handle.
- · When mixing plaster, make sure a ventilator is on above your work space. (red handle should be pointing upwards)
- · When using the large cutting machine, make sure all fingers, long hair, dangling jewellery/ ID’s are away from the blade.
- · When using the vacuum former, do not touch the plastic as it is melting... it’s hot! Make sure you clamp the machine’s handles down so there is no chance of the hot plastic slipping and burning somebody.
- · When using the band saw, wear goggles and make sure ventilation is turned on. You can use a stick on the side closest to the saw to push the plastic through. Turn the machine off by pressing the red button and clean the space (with a brush, not your hand!) for the next person.
Fibreglassing an army helmet
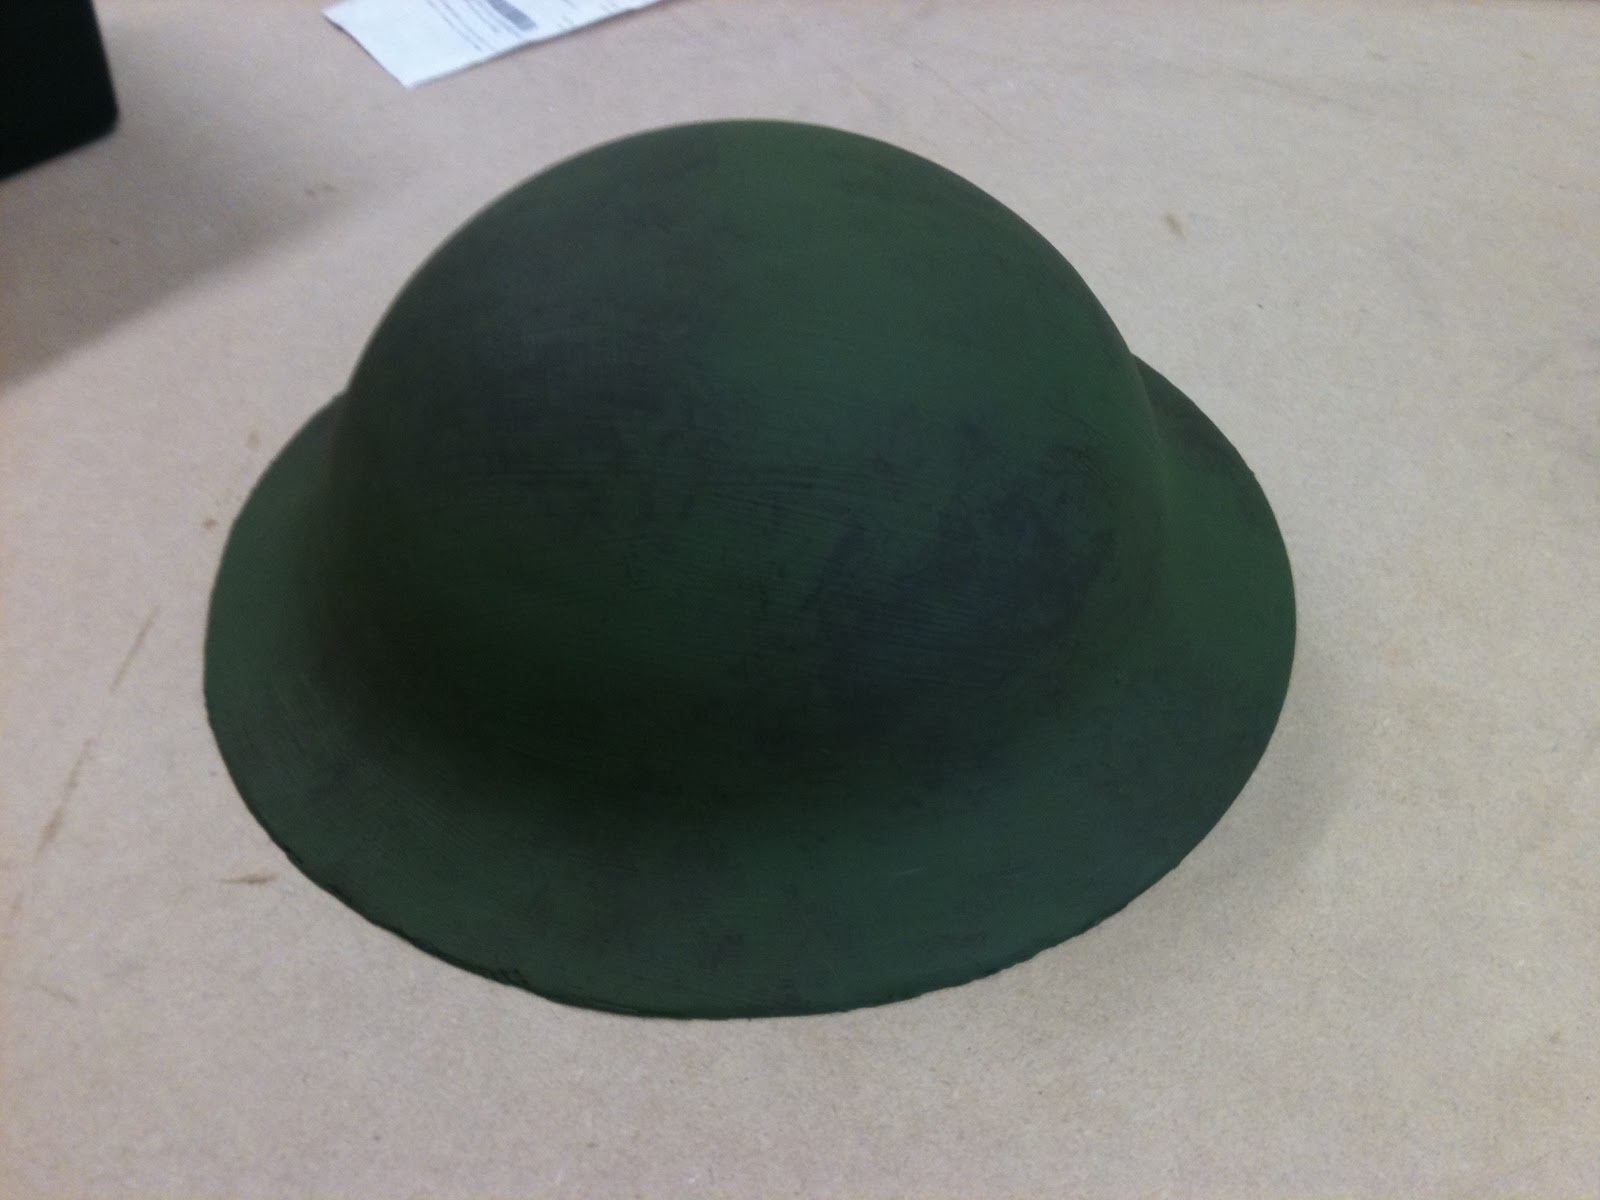
- You should wear your goggles, mask and gloves at all times.
- Make sure ventilation is on.
- Mix the polyester gel coat and hardener with a wooden stick. Wear goggles, mask and gloves! Don’t mess around when doing this, there are other people other than yourself you can harm! Stick to the correct measurements when using liquid hardener… too much and it becomes extremely flammable.
- Keep the sheets of fibreglass in your space… it is easily spread and can be quite harmful if shreds of it are breathed in. Wear gloves and mask for this!
- Tidy your work space after you have finished with it.
Moulding and casting

- · Make sure you have a clean work space.
- · Be careful of your fingers when using the hot glue gun!
- · Mind your fingers when cutting the thin plastic. Also put the scalpel in a visible place you can find it afterwards as people are easily hurt if they can’t see sharp objects near them.
- · When mixing the silicone liquid and hardener wear goggles, gloves and mask.
- · When using the vacuum degassing machine, make sure the lid is on the top when in use. When you want to release the pressure, move the handle slowly!
- · Wear gloves when pouring the mixture into the mould and be careful not to spill any!
Making bread and cheese from polystyrene

- · Make sure you have a clean work space and work on a board.
- · Be careful when using the carving knife! Cut away from you and make sure your fingers aren’t in the way.
- · Use the shaping tools carefully, make sure your fingers aren't in the way.
- · Clear your space regularly, polystyrene builds up quickly!
- · Mind your fingers when using sandpaper too.
- · Clean your work space completely after you have finished.
 |
| Health & safety at its most fashionable! |
Tuesday 1 November 2011
Ageing the Teddy Bear (3)
I continued ageing the bear because I didn't think it looked totally right yet.
I unpicked a section of the leg and patched that up with the hessian material.

I also unpicked some stitching on the right arm to show that that is the worn side, as he carries the Teddy Bear with that arm.

I have decided not to age the bear more as the child would have only had it for 7 years, so some damage would have been done to the bear, but not as much as you see in pictures today of 1900s Teddy Bears.


I'm pleased with how the Teddy Bear has turned out. I think that I made the right decision not to age the bear too much, as it would be used for a production set in World War one rather than today.
Sunday 30 October 2011
Ageing the Teddy Bear (2)
Continuing with the Teddy Bear, I unpicked some stitching on the stomach and patched this up with some coarse hessian material. I chose this material as this would have been around in World war one, sacks and some clothing would have been made from this. This will also show an example of "make do and mend" on the bear.

I tried to put PVA glue on some bits of the teddy to clump the fur together. This wasn't really noticeable and especially for theatre, this wouldn't be seen by the audience at all.

I also totally unpicked the Teddy Bear's head from the body and stitched it back on. I wanted one side of the head looser than the other so that it can slope to the side. I also left visible stitching to give the impression that the mother has repaired it a few times.

I continued wearing down the fur with sandpaper on the head.

Saturday 29 October 2011
Ageing the Teddy Bear (1)
Keeping with the narrative of the 7 year old boy, I am going to create another prop around this.
As Teddy Bears were popular from the early 1900s onwards I want to create an aged one.
I bought a 1900s style Teddy Bear from the Imperial War Museum a few weeks ago and I want to age this. If I had more time I would have made the Teddy Bear myself, however I don't think that it would have looked as good as, or would be made to a high enough standard as the bought bear.

The most obvious way to show wear and tear on the bear was to replace an eye with a button. So I started to cut the fabric around the eye and after some time it came out. I replaced this with a wooden button.


I then experimented with tea staining the fabric. Once dried I couldn't see much difference in colour so tried watered down brown acrylic instead. This was much more effective so I decided to use this instead.


I decided to stain one side more than the other because I want to base my narrative around Peter (the little boy) dropping the Teddy Bear in the fields where his father was working.
I also wore the fabric down on the right arm as this is the arm Peter holds to carry the Teddy Bear. I cut the wooly fabric first, close as I could to the core of the Teddy Bear. I then sandpapered over it to wear the fabric down even more.

Wednesday 26 October 2011
Making bread & cheese from polystyrene
Bread


- Start with a block of polystyrene (white, loose grained polystyrene) and draw an oval shape onto the top.
- Using a carving knife (not a Stanley knife!) cut small sections of the block until you get to the edges of the shape.

- Using the tools (like big files) shape the block by rounding the edges etc.

- Using the rounded tool, make the grooves on the top of the bread.

- Then sand the whole thing to its final shape.

- Cut some muslin into small squares. Mix PVA glue with some water and stick the squares down using the mixture and a brush. Cover the whole loaf.

- Leave to dry. The muslin creates a hard surface which makes it more durable to be used on stage. Once dry you can paint it!

Cheese
- The polystyrene I used to make this prop is a lot denser than the last lot of polystyrene used, but the same process applies.

- Draw the desired shape onto the top of the block then cut to that shape.
 |
| This polystyrene already gives good texture when cut for cheese |
- Use the tools and sandpaper to get it into the correct shape.
- You can then use the PVA and water mixture with the squares of muslin to cover the cheese.
- I used Idendant (a white putty) on the sliced cheese sides as I wanted to add the hole detail to it and it is easily shaped. It still gives the same hardening effect as muslin. Idendant can also be used to make shapes on the white looser polystyrene. A heater can then be blown over the surface of the polystyrene and it will melt, leaving the shape in Idendant remaining. (Stamps can be created like this.)
- Leave to dry. You can then paint it.


Ta daa!
I've finished the tin!
Over all, I'm really pleased with how this has turned out. I think the lid looks effective from a distance and I also like the crayons; how simple they were to make but how authentic & effective they look.
I would be happy for this to be used on stage, however if this was to be used on film I would make the tin differently as much more detail would be needed e.g vacuum forming, casting and moulding?


Tuesday 25 October 2011
Making the bullet & book page
Making the bullet
I'm really pleased with how the tin is going, but I thought it would be nice to add an item that shows the war around the child that he could find and add to his tin.
My first thought was bullets, so I researched some images.

I like the idea of adding a bullet to the tin to show the contrast of the innocence of the toys but bloodshed of war.
I found a chunky lid to a pen in my room and covered this in paper. I then made the tip to a point with PVA and tissue and waited for that to dry.
I then filled the bottom of the lid with Plasticine, then coated the whole thing in a layer of the gold acrylic paint.
I painted red and white detailing on the bottom of the bullet then dabbed brown paint over the whole thing. I then scratched into it with sandpaper.

Making the book page
I also want to include something of a soldier's so I started to think about that. I remembered that I bought a World War one replica pack from the Imperial War Museum a few weeks ago. The pack has replicas of medical reports and national registration certificates which I was thinking of making, however these are items the soldiers would have kept on them and wouldn't fall into the hands of a child.
I was reading a replica of "When to join the ranks" and found some of the rules and language used quite interesting, so I made a page from this to include in the tin, as this is something that probably would have been easily lost in World War one.


I created this page in Word. The text is size 9 Times New Roman font. This page would have been more effective if I had a typewriter, but Times New Roman was the closest font I could find without one.
I aged this by tea staining the paper (surprise surprise!). I wanted darker patches too, so I watered down some brown acrylic and dabbed this on with a tissue, which I think looks quite effective.

Monday 24 October 2011
Making the marbles and crayons
With my research on children's toys I headed to good old Poundland and bought some marbles and crayons.
I aged the marbles by covering them in black acrylic then scratching into them with sandpaper.


The crayons were made by removing the wrappers to them and measuring them. (7.4cm x 3.7cm)

Then looking back at my research, I went to Photoshop with the aim of creating a replica of the wrapper that was used on the crayons in the 1900s.

The old wrappers were surprisingly easy to make on Photoshop! I created a coloured rectangle (I made 3 versions as I wasn't sure of the right colour) I then selected "Engraving" font and typed "CRAYOLA" in bold capitals size 12. "Studio and school crayon" was size 9 directly under it. "Trade Mark" was arial size 9 font. I then made the wavy line marks with the brush tool and playing with the brush type.
I then wrapped these around three crayons and wore the ends down to show that they have been used.

I aged the marbles by covering them in black acrylic then scratching into them with sandpaper.


The crayons were made by removing the wrappers to them and measuring them. (7.4cm x 3.7cm)

Then looking back at my research, I went to Photoshop with the aim of creating a replica of the wrapper that was used on the crayons in the 1900s.

The old wrappers were surprisingly easy to make on Photoshop! I created a coloured rectangle (I made 3 versions as I wasn't sure of the right colour) I then selected "Engraving" font and typed "CRAYOLA" in bold capitals size 12. "Studio and school crayon" was size 9 directly under it. "Trade Mark" was arial size 9 font. I then made the wavy line marks with the brush tool and playing with the brush type.
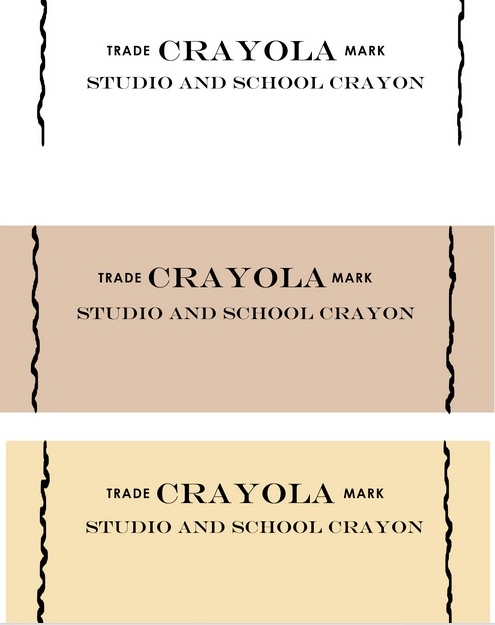 |
| I chose the bottom wrapper as this was the closest colour I could make to the original. |
I then wrapped these around three crayons and wore the ends down to show that they have been used.

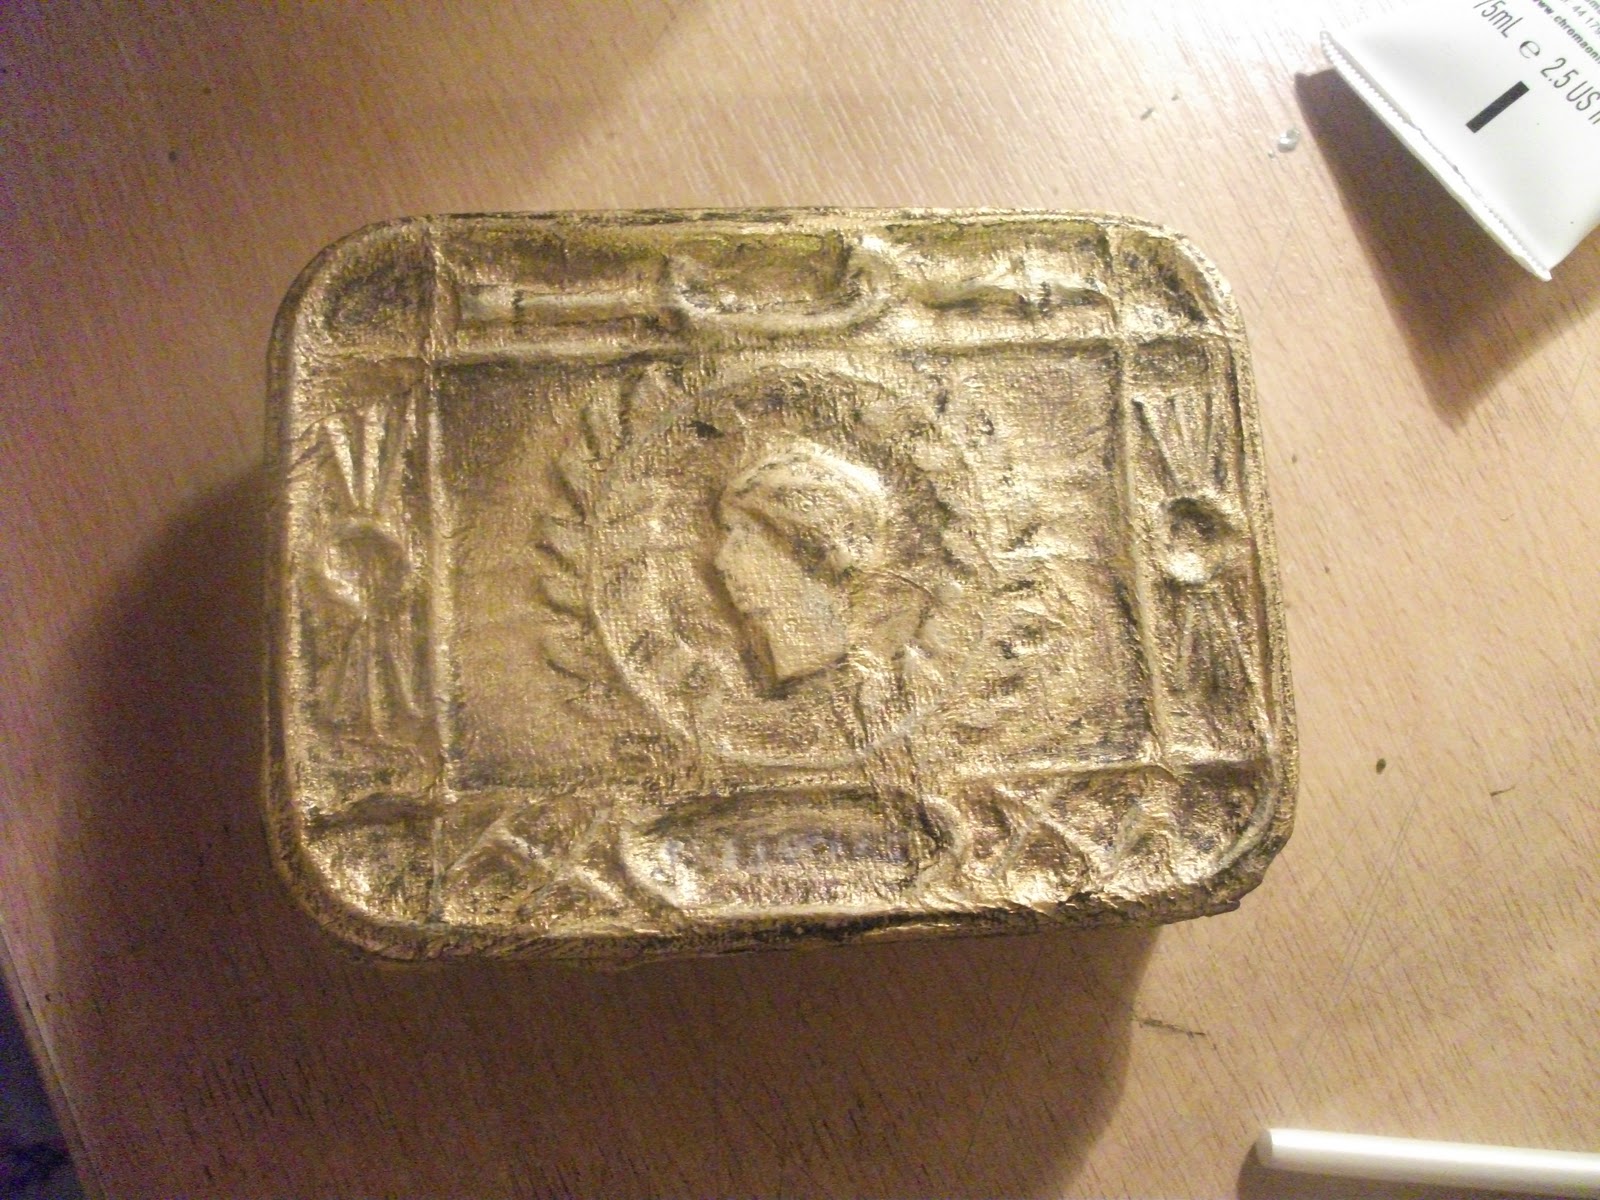
Painting the lid... again
I woke up this morning, looked at the tin lid and decided it wasn't quite right.
I went back to it and added some lighter bits (the criss- cross section at the bottom and the leaves in the centre) to make them stand out more.
I felt like some of the detail was lost so by adding in the faint highlights I was able to see the detail more easily.
I also mixed the brown and gold acrylics and painted on a different shade where dirt etc would be which I think makes it look more realistic.
I am much happier with how it looks now...
Sunday 23 October 2011
Painting the lid
Now that the lid is completely dry I started to paint it.
I gave it two layers of gold acrylic paint.

I then got a flat brush and dipped this in black acrylic. With hardly any paint on the brush I went over the lid (dry brushing) as Andy told me to. I liked the effect this gave but it wasn't obvious enough so I gave it a second coat.

I faintly added detail such as Queen Mary's face and a few shadows such as underneath the sword.
I then scratched over the lid with some sandpaper.

Saturday 22 October 2011
Ageing the tin
I covered the lid completely in a second layer of tissue and PVA glue and left it to dry again.
Whilst I was waiting for that to dry I started to age the tin.

First off I dabbed some scrunched up tissue into black and brown acrylic and dabbed this onto random places on the tin. I built up a few layers of this.

I went over this lightly with sandpaper. I liked the effect this gave but wanted more prominent scratches.
I then worked into the tin more with a pair of scissors, pressing hard to get deep scratches.

I then smudged brown acrylic paint over these with my finger so that the paint would get into the grooves.

I wiped off the excess paint with tissue leaving visible brown scratches in the tin.


I was pleased with how it was looking, but wanted to age the tin more because the tin's time in the trenches would be evident, but also now that it belongs to a child more wear & tear would occur.
I started looking around my room for ways that I could age the tin and resorted to bashing the tin on the edge of my desk.
I also started scraping the edge of the tin on my outside window-ledge. (My flatmates probably think I'm mad!)

Subscribe to:
Posts (Atom)